학습 개요
java.nio패키지는 기존java.io패키지를 개선한 새로운 입출력 패키지임File클래스를 대체하는Path인터페이스, 입출력 기능을 모두 제공하고 버퍼를 사용하게 설계된FileChannel클래스, 파일의 읽기/쓰기나 조작을 위한 정적 메소드를 제공하는Files클래스 등을 학습함WatchService는 디렉터리에 생기는 변화를 감시하는 서비스임
학습 목표
Path인터페이스의 사용법을 이해함Files클래스를 사용하여Path객체를 조작할 수 있음- 버퍼와
FileChannel클래스를 이용하여 파일 입출력을 수행할 수 있음 WatchServie를 활용하여 디렉터리의 변화를 감시할 수 있음
강의록
java.nio패키지
java.nio패키지
- NIO는 New Input Output의 약자
- 기존
java.io패키지를 개선한 새로운 입출력 패키지
- 기존
- JDK 7부터는 파일 I/O를 개선한 NIO2도 등장
java.nio와 그것의 서브 패키지 형태java.nio.file,java.nio.channels,java.nio.charset등
- File 클래스보다 다양한 기능을 제공하는 Path
- Files의
static메소드를 통한 파일/디렉터리의 조작, 파일의 읽기/쓰기 - 파일 입력과 파일 출력이 모두 가능한 FileChannel 클래스
- 버퍼링 기능, 멀티 스레드에 안전
- 비 동기식 파일 입출력을 위한 AsynchronousFileChannel 클래스
- non-blocking 방식 파일 입출력
Path인터페이스
java.nio.file패키지에 존재하며java.io.File클래스를 대신함- 파일 시스템에 존재하는 파일이나 디렉터리에 해당하는 경로를 표현
- 절대 경로 또는 상대 경로로 표현 됨
- 경로의 생성, 경로의 비교, 경로 정보 추출, 경로 요소 조작 기능 등을 제공
java.nio.file.Files클래스의static메소드를 이용해Path객체에 대한 다양한 실제 조작(생성, 읽기, 쓰기, 복사, 이동 등)이 가능함
-
Path객체의 생성 방법1
Path p = Paths.get("C:\\tmp\\foo");
- 파일이나 디렉터리의 절대 또는 상대 경로를 명시해야 함
Path인터페이스의 메소드
-
주요 메소드
메소드 설명 int compareTo(Path other)두 경로를 비교하여 같으면 0을 반환 Path getFileName()디렉터리 또는 파일의 이름을 Path객체로 리턴FileSystem getFileSystem()Path객체를 만들어 준FileSystem객체를 리턴Path getName(int index)경로에서 index에 해당하는 이름을 Path객체로 리턴int getNameCount()경로에 포함된 원소의 개수를 리턴 Path getParent()부모 경로를 Path객체로 리턴Path getRoot()루트 디렉터리를 Path객체로 리턴Iterator<Path> iterator()경로에 존재하는 모든 디렉터리 또는 파일의 이름을 Iterator 객체로 리턴 File toFile()Path객체를File객체로 변환하여 리턴String toString()Path객체를 문자열로 변환하여 리턴
Path인터페이스의 사용 예
-
Path인터페이스 사용 예제1 2 3 4 5 6 7 8 9 10 11 12 13 14 15 16 17 18 19 20 21 22 23 24 25 26 27 28 29 30 31 32 33
import java.util.*; import java.nio.file.*; public class Main { public static void main(String args[]) { try { Path path = Paths.get("C:\\windows\\system32\\drivers\\etc\\hosts"); System.out.println("파일 이름 : " + path.getFileName()); System.out.println("상위 폴더 : " + path.getParent().getFileName()); System.out.println("경로 길이 : " + path.getNameCount()); System.out.print("현재 경로 : "); for (int i = 0; i < path.getNameCount(); i++) System.out.print(path.getName(i) + "\\"); Iterator<Path> it = path.iterator(); // Iterator를 사용하여 경로를 순회 System.out.print("\n현재 경로 : "); while (it.hasNext()) System.out.print(it.next().getFileName() + "\\"); System.out.println(); } catch (Exception e) { System.out.println(e); } } } // 파일 이름 : hosts // 상위 폴더 : etc // 경로 길이 : 5 // 현재 경로 : windows\system32\drivers\etc\hosts\ // 현재 경로 : windows\system32\drivers\etc\hosts\
FileSystem클래스와 FileStore클래스
FileSystem클래스의 메소드FileSystem은 파일 시스템에 대한 인터페이스를 제공FileSystems.getDefault()은 기본 파일 시스템을 리턴 함
Iterable <FileStore> getFileStores()- 하나 이상의 파일 스토어로 구성됨
WatchService newWatchService()
FileStore클래스의 메소드-
FileStore는 저장소(파티션 또는 볼륨)를 표현함1
String name(), String type()
1
  long getTotalSpace()
1
  long getUnallocatedSpace()
1
  long getUsableSpace()
-
FileSystem과 FileStore클래스의 사용 예
-
FileSystem객체로 디스크 정보 출력하기1 2 3 4 5 6 7 8 9 10 11 12 13 14 15 16 17 18 19 20 21 22 23 24
import java.nio.file.*; public class Main { public static void main(String args[]) throws Exception { FileSystem fs = FileSystems.getDefault(); for (FileStore store: fs.getFileStores()) { System.out.println("드라이브 이름 : " + store.name()); System.out.println("파일시스템 : " + store.type()); long total = store.getTotalSpace(); long free = store.getUnallocatedSpace(); System.out.println("전체 공간 : " + total + " bytes"); System.out.println("사용 중인 공간 : " + (total - free) + " bytes"); System.out.println("사용 가능한 공간 : " + free + " bytes"); System.out.println(); } } } // 드라이브 이름 : C드라이브 // 파일시스템 : NTFS // 전체 공간 : 499431501824 bytes // 사용 중인 공간 : 462690144256 bytes // 사용 가능한 공간 : 36741357568 bytes
Files클래스
- 파일 조작 기능을 제공하는
static메소드를 제공함 - 메소드는
Path객체를 인자로 가지고 작업함 -
파일의 읽기와 쓰기 메소드
1
  byte[] readAllBytes(Path)
1
  Path write(Path, byte[])
-
파일이나 디렉터리의 검사/생성/삭제/복사/이동/속성 관리 메소드
1
  boolean isDirectory(Path)
1
  boolean isRegularFile(Path)
1
  Path createFile(Path)
1
  Path createDirectory(Path)
1
  void delete(Path)
1
  Path copy(Path, Path)
1
  Path move(Path, Path)
1
  long size(Path)
1
  UserPrincipal getOwner(Path)
Files클래스의 사용 예
-
디렉터리 내용 확인하기
1
2
3
4
5
6
7
8
9
10
11
12
13
14
15
16
17
18
19
20
21
22
23
  import java.nio.file.*;

  public class Main {
      public static void main(String args[]) throws Exception {
          Path path = Paths.get("C:\\Java");
          DirectoryStream<Path> ds = Files.newDirectoryStream(path);
          for (Path p : ds) {
              if (Files.isDirectory(p)) {
                  System.out.println("[디렉터리] " + p.getFileName());
              } else {
                  System.out.print("[파일] " + p.getFileName());
                  System.out.println(" (" + Files.size(p) + ")");
              }
          }
      }
  }

  // [디렉터리] Example
  // [파일] FileInputStreamTest.java (434)
  // [파일] FilesTest1.java (800)
  // [디렉터리] temp
  // [파일] winhlp.exe (9728)
  // [파일] winhlp32.exe (9728)
버퍼
버퍼
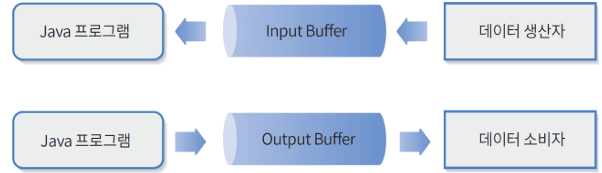
- 데이터 생산자로부터 프로그램으로 데이터가 입력 될 때, 입력 속도와 처리 속도의 차이로 인해 지연이 발생할 수 있음
- 프로그램으로부터 데이터 소비자로 데이터가 출력 될 때도 마찬가지
- 버퍼를 사용하면 지연 현상을 방지할 수 있음
- 프로그램은 버퍼로부터 데이터를 읽음(입력)
- 프로그램은 버퍼로 데이터를 출력함(출력)
-
버퍼의 역할
Buffer클래스
- 버퍼는 기본형 값을 저장하는 데이터 보관소
- 채널 입출력에 사용되며 버퍼 단위로 입출력할 수 있음
Buffer는 추상 클래스로java.nio패키지에 존재- 자식 클래스에서 구현해야 할 공통의 메소드를 선언
- 실제 사용을 위해 boolean을 제외한 모든 기본형에 대해 Buffer의 서브 클래스가 존재함
ByteBuffer,CharBuffer,DoubleBuffer,FloatBuffer,IntBuffer,LongBuffer,ShortBuffer
버퍼의 생성
-
버퍼의 생성 방법
1
  Buffer buffer = ByteBuffer.allocate(1024*1024);
1
  byt[] barray = new byte[100];
1
  Buffer bbuffer = ByteBuffer.wrap(barray);
-
버퍼의 속성
- 0 ≤
mark≤position≤limit≤capacity capacity- 버퍼의 크기(데이터의 개수)로, 생성 될 때 정해짐
position- 읽기나 쓰기가 적용되는 위치
position≤limit
limit- 읽거나 쓸 수 없는 최초 위치
limit≤capacity
markreset()되었을 때position이 가리킬 위치
- 0 ≤
Buffer클래스의 메소드
-
주요 메소드
메소드 설명 Buffer mark()mark를position의 값으로 설정Buffer reset()position을mark의 값으로 설정Buffer rewind()position을 0으로 바꾸고mark를 삭제함, 처음부터 다시 읽기를 준비하는 것Buffer flip()limit를position값으로 설정하고position은 0으로 변경함, 버퍼에 쓰기를 끝내고 버퍼 읽기를 준비하는 것Buffer clear()버퍼를 초기 상태로 돌림, 새로운 쓰기를 준비하는 것 int capacity()현재 capacity값을 리턴int position()현재 position값을 리턴int limit()현재 limit값을 리턴
버퍼 읽기와 쓰기
Buffer의 서브 클래스에서 제공ByteBufferCharBufferDoubleBuffer
- 상대적 읽기/쓰기 메소드
- 현재
position의 위치에서 읽기 또는 쓰기를 수행하며, 읽거나 쓴 요소 만큼position값이 증가함
1
  byte get()
1
  ByteBuffer get(byte[])
1
  ByteBuffer put(byte)
1
  ByteBuffer put(byte[])
- 현재
- 절대적 읽기/쓰기 메소드
- 읽거나 쓸 위치를 매개 변수 index로 지정
position값에 영향을 주지 않음
1
  byte get(int index)
1
  ByteBuffer put(int index, byte b)
FileChannel클래스
FileChannel클래스
java.io패키지의 파일 관련 입출력 스트림을 대체java.nio.channels패키지에 존재- 파일에 대한 읽기와 쓰기를 모두 제공
- 멀티 스레드 환경에서도 안전하게 사용할 수 있음
-
읽기와 쓰기 메소드
1
  int read(ByteBuffer dst)
1
  int write(ByteBuffer src)
-
객체 생성 방법
1
  FileChannel.open(Path path, OpenOption ... options)
- 옵션은
StandardOpenOption.READ - 그 외
CREATE,WRITE,APPEND등 FileInputStream,FileOutputStream또는RandomAccessFile객체에서getChannel()
- 옵션은
FileChannel클래스로 파일 만들기
1
2
3
4
5
6
7
8
9
10
11
12
13
14
15
16
17
18
19
20
21
22
23
24
25
26
27
28
29
30
public class Main {
    public static void main(String args[]) throws IOException {
        String[] data = { "안녕하세요, 여러분",
            "Java 프로그래밍 언어의 세계로 오신 것을 환영합니다.",
            "JDK를 설치하는 방법에서부터 ",
            "Java 프로그램을 compile하고 실행시키는 ",
            "모든 방법에 대해 공부해봅시다."
        };
        Path path = Paths.get("c:\\Java\\temp\\file.txt");

        Files.createDirectories(path.getParent());

        FileChannel fileChannel = FileChannel.open(path,
            StandardOpenOption.CREATE,
            StandardOpenOption.WRITE);

        Charset charset = Charset.defaultCharset();
        ByteBuffer buffer;

        int byteCount = 0;

        for (int i = 0; i < data.length; i++) {
            buffer = charset.encode(data[i]);
            byteCount = fileChannel.write(buffer);
        }

        System.out.println(byteCount);
        fileChannel.close();
    }
}
FileChannel클래스로 파일 읽기
1
2
3
4
5
6
7
8
9
10
11
12
13
14
15
16
17
18
19
20
21
22
23
public class Main {
    public static void main(String args[]) throws IOException {
        Path path = Paths.get("c:\\java\\temp\\file.txt");

        FileChannel fileChannel = FileChannel.open(path, StandardOpenOption.READ);
        ByteBuffer buffer = ByteBuffer.allocate(1024 * 1024);
        Charset charset = Charset.defaultCharset();
        StringBuffer sb = new StringBuffer();
        int byteCount;

        while ((byteCount = fileChannel.read(buffer)) >= 0) {
            buffer.flip();
            sb.append(charset.decode(buffer));
            buffer.clear();
        }

        System.out.println(sb);

        fileChannel.close();
    }
}

// 안녕하세요, 여러분Java 프로그래밍 언어의 세계로 오신 것을 환영합니다. JDK를 설치하는 방법에서부터 Java 프로그램을 compile하고 실행시키는 모든 방법에 대해 공부해 봅시다.
WatchService인터페이스
WatchService인터페이스
WatchService- 어떤 대상을 정한 후 변화나 이벤트가 생기는 것을 감시(watch)
- 감시 대상은
Watchable객체로,register()메소드를 사용하여WatchService객체에 감시 대상으로 등록 됨 - 디렉터리를 표현하는
Path객체의 변화를 감지- 디렉터리 내의 파일 또는 서브 디렉터리의 생성, 삭제, 수정
java.nio.file패키지에 존재
- 감시자의 생성
- 먼저
WatchService객체를 생성함
1
  WatchService ws = FileSystem.getDefault().newWatchService();
- 먼저
감시 절차
- 감시 서비스를 구현하는 절차
-
감시 대상 디렉터리를
WatchServcie에 등록1
Path path = Paths.get("c\\java\\temp");
- 등록 시 알림을 받고자 하는 이벤트를 명시
1
  path.register(ws, StandardWatchEventKinds.ENTRY_CREATE, StandardWatchEventKinds.ENTRY_DELETE, StandardWatchEventKinds.ENTRY_MODIFY);
WatchService는take()메소드를 호출하여 감시함- 무한 루프 안에서, 이벤트가 발생할 때 까지 기다림
1
2
3
  While(true) {
      WatchKey key = ws.takae();
  }
- 이벤트가 발생하면,
take()가 리턴하는WatchKey객체를 이용하여 이벤트를 처리 WatchKey는 감시 상태, 감시 대상 디렉터리, 이벤트 정보를 가짐pollEvents()를 호출하여WatchEvent객체를 얻고 어떤 변화가 생겼는지 알 수 있음
1
2
3
4
5
6
7
8
9
  for (WatchEvent<?> event : key.pollEvents()) {
      WatchEvent.Kind k = event.kind(); // 이벤트 종류
      Path p = (Path) event.context(); // 파일 이름

  }

  boolean valid = key.reset(); // 계속 감시하기 위해
  if (!valid)
  break;
-
WatchService 예제
-
WatchServcie인터페이스 이용하기1 2 3 4 5 6 7 8 9 10 11 12 13 14 15 16 17 18 19 20 21 22 23 24 25 26 27 28 29 30
try { WatchService ws; ws = FileSystems.getDefault().newWatchService(); Path path = Paths.get("c:\\java\\temp"); path.register(ws, StandardWatchEventKinds.ENTRY_CREATE, StandardWatchEventKinds.ENTRY_DELETE, StandardWatchEventKinds.ENTRY_MODIFY); while (true) { WatchKey key = ws.take(); for (WatchEvent<?> event : key.pollEvents()) { WatchEvent.Kind k = event.kind(); Path p = (Path) event.context(); if (k == StandardWatchEventKinds.ENTRY_CREATE) { System.out.println("File " + p.getFileName() + " is created."); } else if (k == StandardWatchEventKinds.ENTRY_DELETE) { System.out.println("File " + p.getFileName() + " is deleted."); } boolean valid = key.reset(); if (!valid) break; } } } // File file.txt is modified. // File 새 텍스트 문서.txt is created. // File 새 텍스트 문서.txt is deleted. // File 새 문서.txt is created.
학습 정리
java.nio와 그것의 서브 패키지는java.io패키지를 개선한 새로운 입출력 패키지임java.nio.file패키지의Path인터페이스는java.io패키지의File클래스보다 풍부한 기능을 제공함Files클래스는 실제 파일(또는 디렉터리) 조작과 읽기 · 쓰기 기능을 수행하는static메소드를 제공함- 채널 입출력에서 버퍼는 기본형 데이터의 보관소이며, 버퍼 단위로 입출력할 수 있음
java.nio.file의FileChannel은 입출력을 모두 제공하고 기본적으로 버퍼링을 사용하며 멀티 스레드 환경에서도 안전하도록 설계되어 있음java.nio.file패키지의WatchService는 디렉터리에 발생하는 이벤트를 감시하는 서비스임
연습 문제
-
Path인터페이스에 관한 설명이다. 잘못된 것은?a. 파일 내용의 읽기와 쓰기 기능을 제공한다.
Path인터페이스에 관한 설명으로 옳은 것java.io.File클래스를 대체할 수 있음- 파일 시스템에 존재하는 파일이나 디렉터리의 경로를 표현함
- 경로의 생성, 경로의 조작/비교, 경로의 요소를 조회하는 기능을 제공함
-
FileChannel클래스에 관한 설명으로 틀린 것은 무엇인가a. 파일 입력을 위해
FileChannelReader, 파일 출력을 위해FileChannelWriter를 사용한다.FileChannel클래스에 관한 설명으로 옳은 것java.io패키지의 파일 관련 스트림 클래스를 대체하기 위한 클래스임FileChannel.open(path)으로 객체 생성을 하면 해당 파일을 읽기 용으로 열게 됨- 멀티 스레드 환경에서도 안전하게 사용할 수 있게 설계되었음
-
WatchService를 이용해 디렉터리를 감시할 때,take()메소드를 호출한다. 이때 디렉터리에 이벤트가 발생하면take()가WatchKey객체를 리턴한다.WatchKey에 관해 설명하라.a.
WatchKey는 등록된 디렉터리에 어떤 관심 이벤트가 등록되어 있으며, 실제 어떤 이벤트가 일어났는 지에 관한 상태 정보를 가지고 있다.